
Implementing SPF, DKIM, and DMARC Records
How to implement the right records to enhance your email deliverability.
Feb 21, 2025

📩 Boost Your Email Deliverability: A Step-by-Step Guide
In this tutorial, we’ll walk you through setting up SPF, DKIM, and DMARC records, essential steps to improve your email deliverability and ensure your outreach campaigns land in inboxes, not spam.
We know this might sound a bit technical, but don’t worry! 😊 We’ve created a clear, step-by-step guide with images, making the process simple and stress-free. The best part? It only takes around 15 minutes to complete.
So, let’s dive in and get everything set up! 🚀
✅ Add an SPF record to my domain for my email
The Sender Policy Framework (or SPF) is a type of TXT record added to a domain's DNS. It makes sure that any email sent from a particular domain comes from an authorized server. When you send an email, the server on the receiving end will double-check if it comes from an IP address that's been authorized by the domain's DNS. It acts as protection against any potential fraud or impersonation attempts.
In case you followed the tutorial and bought the domain + email on GoDaddy:
⚠️ If your domain, DNS and email are in the same GoDaddy account, the SPF record is automatically added for you and you don’t have to do anything, so you do not have to read the information below.
Step 1: Figure out what the value of your SPF record is
The value of your SPF record varies, depending on what products you have and where your DNS is hosted:
If you use Professional Email, Media Temple Mail or Microsoft 365 from GoDaddy, your value is
v=spf1 include:secureserver.net -all.If you use Microsoft 365 from GoDaddy and the Advanced Email Security add-on, you’ll need to check what your value is in the Email & Office Dashboard. It should either be
v=spf1 a:dispatch-us.ppe-hosted.com include:secureserver.net -allorv=spf1 include:_spf-usg1.ppe-hosted.com include:secureserver.net ~all.If you use multiple email services, like third-party email marketing products, you need to include them in your SPF record. Contact your provider to get their SPF record. The portion of the value after “spf1” is where you’ll include their SPF record, in addition to
include:secureserver.net.
⚠️ Your domain can only have one SPF record. If multiple SPF records are found on your domain or if the SPF record is not added correctly, your email might not be delivered.
Step 2: Add an SPF record to your domain
These steps are for domains with DNS managed at GoDaddy. If your domain is not with GoDaddy, you'll need to update your records with your DNS provider.
Sign in to your GoDaddy Domain Portfolio.
Under Domain Name, select your domain.
Under your domain name, select DNS.

Select Add New Record, and then enter the following details:
Type: Select TXT.
Name: Enter @
Value: Enter your value based on the previous section.
TTL: Leave it as Default.

Select Save.
Most DNS changes take effect within an hour but could take up to 48 hours to update globally. If you're missing an SPF record, using an incorrect SPF record, or using more than one SPF record, you'll see a banner alerting you in your Email & Office Dashboard. (If you have more than 5 domains, you might not see these alerts, so make sure to double check your SPF record.)
✅ Enable and add DKIM to my domain for Microsoft 365
Adding DomainKeys Identified Mail (or DKIM) to your DNS settings signs your emails so that anything sent from your organization is trusted by receiving email systems. It's another way to tell your recipients that it's really you sending the messages, and not someone impersonating you. You'll need to create DKIM keys, add the records to your DNS and then enable it.
⚠️ You need admin permissions to create and add DKIM records to your organization. If needed, you can change your Microsoft 365 user's admin permissions.
If you have Microsoft 365 with Advanced Email Security from Proofpoint. (If you have Advanced Email Security powered by INKY, select Microsoft 365) you can follow the instructions from this link: Microsoft 365 with Advanced Email Security
Step 1: Create your DKIM keys
First, we'll access your Defender Portal to generate your DKIM keys.
Sign in to the Microsoft 365 Defender Portal. Use your Microsoft 365 email address and password (your GoDaddy username and password won't work here).
Under DomainKeys Identified Mail (DKIM), select your domain name. (Make sure to select the domain name itself, and not the checkbox next to it.) A window will open on the rightmost side.

Select Create DKIM keys. The keys will be generated as CNAME records and will start like this:
Host Name : selector1._domainkey
Points to address or value: selector1-
Host Name : selector2._domainkey
Points to address or value: selector2-
Select Copy. The hostname and value of both records will be copied to your clipboard. You'll need the records in the next step, so we recommend pasting them into another document.
Step 2: Add the records to your DNS
Next, we'll add your keys to your DNS as CNAME records. These steps are for domains with DNS managed at GoDaddy. If your domain is not with GoDaddy, you'll need to update your records with your DNS provider.
In your web browser, open a new tab.
Sign in to your GoDaddy Domain Portfolio. (Need help logging in? Find your username or password.)
Under Domain Name, select your domain.
Under your domain name, select DNS.
Select Add New Record, and then enter the details of your first record:
Type: Select CNAME.
Name: Using the first key that you generated in step 1, enter the hostname.
Value: Using the first key that you generated in step 1, enter the value.
TTL: Leave it as Default.

Select Add More Records.
Repeat the steps to add your second CNAME record. This should look like the picture below, only in the Value part you still need to fill in the right value that comes after: selector1- and selector2-.
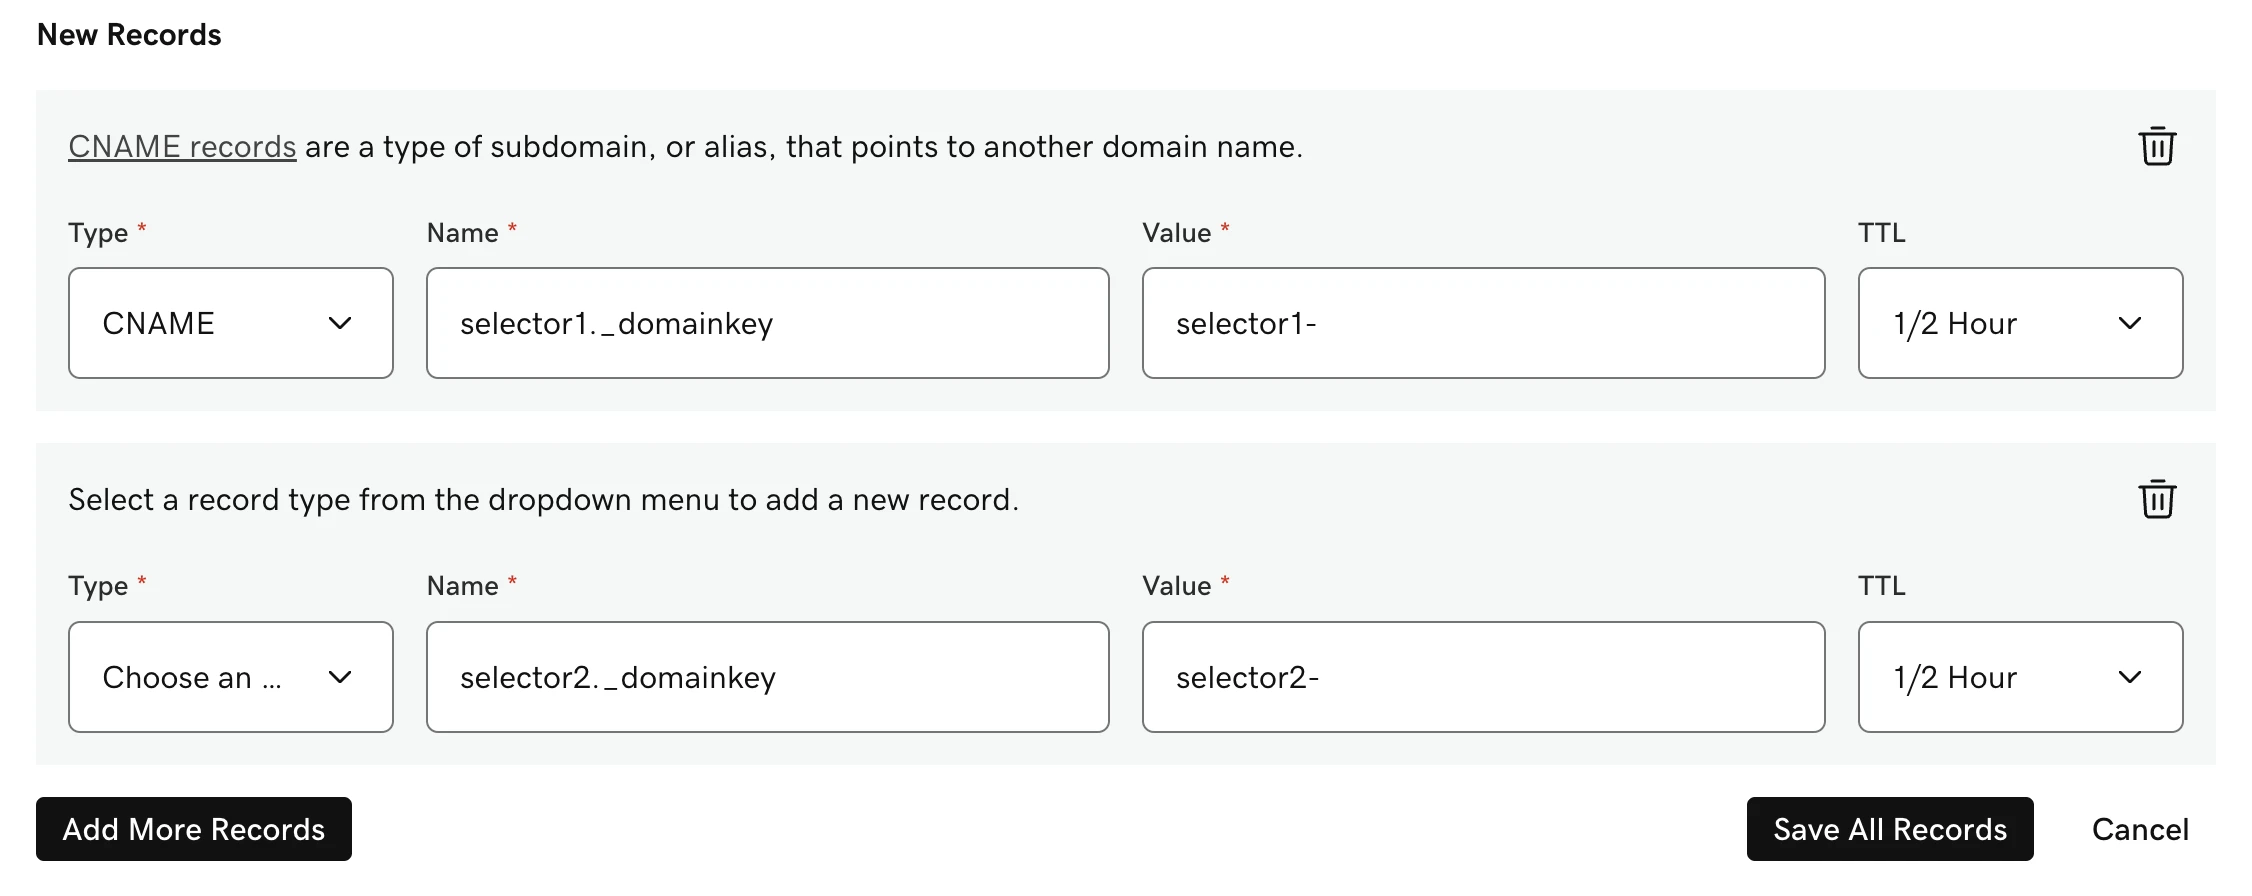
Select Save All Records.
Both records will be saved to your DNS. Most DNS changes take effect within an hour but could take up to 48 hours to update globally.
Step 3: Enable DKIM
Lastly, we'll go back to the Defender Portal to enable DKIM for your organization.
Sign in to the Microsoft 365 Defender Portal. Use your Microsoft 365 email address and password (your GoDaddy username and password won't work here).
Under DomainKeys Identified Mail (DKIM), click on your domain name. A window will open on the rightmost side.
Turn on the Sign messages for this domain with DKIM signatures toggle. Your changes will save.
Select OK.
If the DKIM records that you added were detected, the toggle will be enabled and your DKIM will be set up.
If your DKIM records were not detected and you see an error, double-check that you entered the CNAME records correctly. Allow up to 48 hours for your records to fully propagate.
⚠️ Microsoft 365 automatically sets up DKIM for initial onmicrosoft.com domains (for example, coolexample.onmicrosoft.com). However, if you have more than one domain in your organization, repeat these steps for each domain.
✅ Add a DMARC record to my domain for Microsoft 365
Domain-based Message Authentication, Reporting and Conformance (DMARC) helps protect your email address from being misused by third parties. It works by verifying your IP address against the owner of your domain, ensuring that an email you send is actually from you.
⚠️ Before you can add DMARC to your domain, you must add SPF and enable DKIM.
Define how suspicious email is handled by DMARC
The value of the DMARC TXT record includes a “p=” parameter. The p stands for “policy.” When an email appears to be from your domain but doesn’t contain the correct information, you can use 1 of 3 policies to define how that email gets handled:
p=none: The receiving email server performs no action against unauthenticated email but instead sends a report to an email listed in the mailto: address on the DMARC record.
p=reject: The receiving email server denies and blocks unauthenticated email.
(Recommended) p=quarantine: The receiving email server quarantines unauthenticated email (for example, sending them to a junk or spam folder instead of an inbox). This is the policy we use in the steps below.
Add a DMARC TXT record to your domain
These instructions are only for domains with DNS managed at GoDaddy. If your domain is not with GoDaddy, you'll need to update your records with your DNS provider.
If you haven't already, add SPF and enable DKIM for your domain.
Sign in to your GoDaddy Domain Portfolio. (Need help logging in? Find your username or password.)
Under Domain Name, select your domain.
Under your domain name, select DNS.
Select Add New Record, and then enter the following details:
Type: Select TXT.
Name:
_dmarcValue:
v=DMARC1; p=quarantine; pct=100; rua=mailto:jane@coolexample.com; ruf=mailto:jane@coolexample.com⚠️ Replace jane@coolexample.com with the email address where you would like to receive notices about DMARC. We recommend using an email address that belongs to the administrator or owner of your domain.
TTL: Leave it as Default.

Select Save.
Most DNS changes take effect within an hour but could take up to 48 hours to update globally.
Awesome! 🎉 You've now set up everything you need to start warming up your email accounts and reaching out to your next clients.